OK, I’ve begged, borrowed or stolen one, how do I learn the saxophone?
This article tells you what you need to know to get started – fingering a few notes, making a sound and playing your first tune.
It seems like a lot of people from all walks of life are thinking about learning to play the saxophone. It’s now easier than ever due to the proliferation of reasonable quality and very inexpensive saxophones from the far east (see our buying advice).

However once you have a saxophone, the easiest part is over, though you may not think so given the multitude of confusing choices and conflicting information you were given while trying to choose what saxophone to buy. Assuming you made a good choice and what you bought was actually a fully working saxophone, rather than one of the many “saxophone shaped objects” out there on Ebay, then your first instinct will probably be to put it in your mouth and blow.
This is possibly the first hurdle to get over, but strictly speaking the order of events is to first assemble the saxophone, then put it in your mouth and blow. Some people might argue that before doing that you should get a good teacher, or else you may fall into bad habits. Yeah right, as if you’re going to sit there looking at your new baby while you wait two weeks for your first saxophone lesson, so I shall tell you how to put the pieces together in a way that might result in you learning at least how to make a sound. First of all though let’s look at another important aspect of owning a musical instrument:
Necessary accessories
If you bought your horn from a dealer, he/she was probably making very little profit from the sale due to the competitive nature of the musical instrument business these days. So there’s a good chance you were conned into buying, persuaded to also buy various accessories. A stand, gigbag, swab, strap, mute, padsaver, reedclipper, polish, gigdust, tuner, music stand, leaklight, key clamps, repair kit, case deodorizer, demoisturizer, cufflinks and Kenny G tee shirt. Well some of these are useful, some are not. I won’t go into great detail here as I shall be writing another page on accessories, but the priorities are:
- a firm case (not a soft gigbag)
- a good solid stand
- a neckstrap
- cork grease
- a swab (or pullthrough) to clean the inside

Forget polish, pad treatment and most of the other stuff for now until you actually know whether you need it and can tell what is a good useful product and what is just snake oil. I almost forgot (in my modesty), to include the saxophone instruction DVD I just happen to have been fortunate enough to be asked to make a few years ago. Some retailers in the UK include this when you but a new saxophone. You can, of course, buy it from this site.
The first thing to be aware of is that some of the keywork (rods, keys etc.) can get bent. Normal light pressure is fine, but if you have to force anything then this is when things could get bent out of whack. During any of the assembly, if you are in doubt, wait until you are with the teacher
How to assemble your saxophone
Time needed: 2 minutes.
Make sure you have all the parts and know how to put them together
- Parts of the saxophone:

- The main body
- The neck (NB:on some sopranos this is already joined on to the body)
- Mouthpiece
- Reed
- Ligature (the gizmo that clamps the reed onto the mouthpiece)
- Picking up the saxophone
 Grasp the middle of the body firmly with one hand (I suggest your right hand if you are right handed, left if you are left handed)
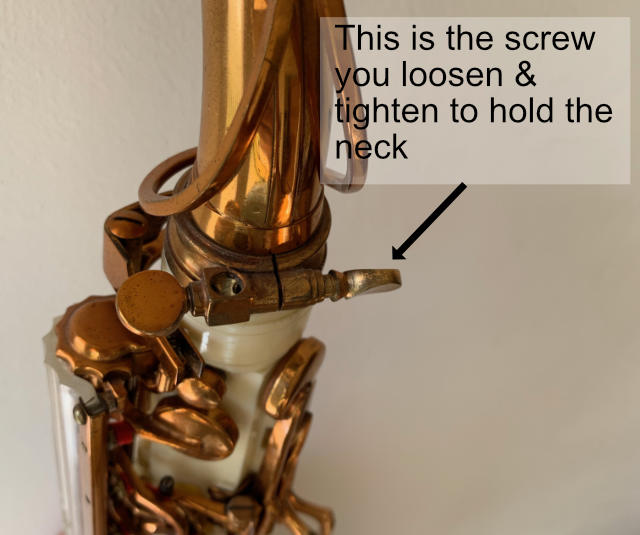
Make sure that the screw at the top has been loosened to allow the neck tenon to fit into the top of the body. Note that there are usually two screws at the top. One of them has a square hole next to it which is used to hold a lyre (marching band music stand). The one you need to loosen is the other one. - Attach the neck
 Holding the neck in your other hand, slide it down into the body. A slight twisting motion might help. If this is very stiff you could try a small blob of oil or cork grease, but if it really does not want to go in, don’t force it – take the saxophone back to the shop or to a good repairer.
Check that the loop of the (octave) key mechanism on the neck fits over the extending octave pin at the top of the body. These should end up being very close but not quite touching. The middle of the back of the neck should be lined up with the extending pin.
Rest the saxophone down in its case or on a stand - Attach the reed to the mouthpiece
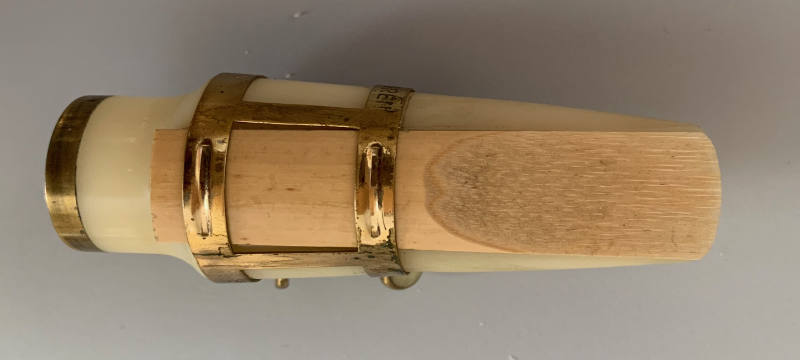
Wet a reed in your mouth, being very careful not to chip the very delicate thin end. (Synthetic reeds do not need wetting).
Place the reed on the flat table of the mouthpiece with the curved end (the thin delicate bit) so that it lines up exactly with the curved tip of the mouthpiece.
Slide the ligature over the reed, being very careful again not to damage the tip, until it is approximately halfway between the end of the shaved part of the reed and the bottom (straight thick) end.
Tighten the ligature screws so that it is just tight enough to hold the reed so that it cannot slip around. - Attach the mouthpiece to the saxophone
 Push the mouthpiece onto the cork at the end of the saxophone neck, being careful not to catch the tip of the reed on anything. You may use a twisting motion to help get the mouthpiece firmly on the neck. How far you push the mouthpiece on depends on the tuning of the saxophone, so for now don’t worry, just make sure it is covering about half of the cork and is a firm fit.
Finally your saxophone is now ready to play
Extract from DVD: First Notes
Disclaimer: This section is not meant to be a lesson in any shape or form, merely a jumpstart to getting a sound out of the instrument. Unless you get a teacher, you could well end up with some bad habits that may take longer to cure the longer you put off realtime lessons.
- Put straphook through ring on back of saxophone
- Place your right hand thumb under thumbrest (a few inches below the straphook)
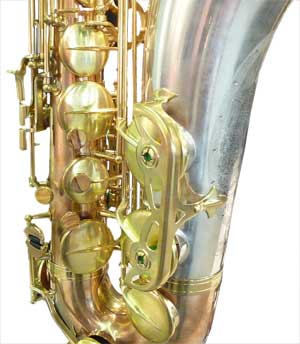
- Place left hand first finger on the B key – (this is the one just above the little key (see illustration)
- Curl lower lip back over lower teeth
- Place top teeth on top of mouthpiece about half an inch back from the tip so that the reed rests on your lower lip
- Blow
- Don’t be surprised if it doesn’t sound great, or, if after a while, you feel some pain in your lips (this is normal and will get better, but don’t overdo your initial practice sessions to the point where you cannot stand the pain)
- Please don’t be sad if you cannot play a tune immediately. Some people can actually do quite well straight away, but most of us do need a little more help…
- You did book a proper lesson didn’t you? If not at least find a good tutor book or DVD.